Showing posts with label diy. Show all posts

Wednesday, June 4, 2014

Easy gift idea

I take no credit for this idea, it was all my daughter Charlotte. Who is 8 years old. If she had her own Pinterest she would easily surpass me in followers, she is that cool:)

It was her idea to put two carnations into a Starbucks cup, and surprisingly it was beautiful! 

Attach a gift card with ribbon and you have a great easy gift!

Thank you sweet Charlotte. 


Monday, June 2, 2014

Easy business card holder


I'm a fairly social person, who is just in the beginning stages of my business, and I am making A LOT of contacts. I noticed that I either didn't have any of my cards on me or I had to dig through a purse full of Target receipts to get to them. Really professional, right?

Oh, one more quick thing about me...I'm cheap...err...frugal:)

So I looked through one of our junk drawers (I have two because I am an overachiever, don't hate) and found an old bandaid holder. Voila, instant business card holder. It happened to be Super Mario Brothers, which is totally rad in itself, but not my thing. 


So here is what I used:

Bandaid holder-metal
Gold or silver sharpie (optional)
Scrap paper
mod podge


I had to use a metallic sharpie since my bandaid holder top was curved and hard to cover with paper. So I decided instead of leaving it blue I could quickly paint it. 

If you are not rushed, you could spray paint the whole tin. That would look truly professional. I quickly colored the blue parts with the gold sharpie, and it looks amazing! 

After you are done painting any exposed metal, cut your scrap paper to size. 

Once your paper is cut, simply mod podge it onto your tin. Be sure to smooth out any bubbles and give it a nice even top coat. 

Let dry and you are finished! 


Sunday, April 27, 2014

A small vintage tour of my home- Dining/ Playroom

As many of you know, I have a thing for vintage. Many moons ago I was a strictly Goodwill and eBay kind of gal. This opened the doors to garage sales and my favorite...estate sales. I prefer estate sales above all else because being in a persons home, seeing their personal items in their element, getting an idea of who the owner was...this is what I love. 

Estate sales also taught me a lot about what matters in decorating and gave me a lot of inspiration along the way. Through the years, because of this, my home has changed drastically. I recall when we first moved into our home, pre-children and pre-everything (marriage and dogs to name a couple), I painted our kitchen yellow. Like McDonald's "golden arch" yellow, and I bought all of the Italian vintage poster dishes and posters that was big in Pottery Barn at the time. Ugh, I HATED it. It wasn't me, it was a picture in a catalog, and surprisingly the yellow gave me stress beyond belief. 

I then came into my own as far as decorating my home, and I am at a place now where I love nearly everything in my home. I say nearly because we have acoustic popcorn ceilings and an unintentional vintage late 1970's kitchen, but those changes will come.

So, if I still have your attention, I'd like to give you a little tour of my home and how I use found vintage and antique items in everyday decorating. I am thinking this can be a series, pictures of my outdated kitchen excluded, ha!
 So, let's get started with the first room in the tour:


I am starting with this room because I just finished it. It has been a playroom for the last 8 years, and I am VERY slowly making it into a dining room. So for now it is a hybrid and that suits us as a family just fine. 

The dining room is average in size, and truthfully I have too much furniture in it. Furniture I just can't part with. I recently purchased the blue painted furniture from Craigslist, a buffet and hutch. It's 1940's and just lovely. The table is an old farm harvest table, that is soon to become a proper table with tall legs, but works now as the girl's play table. 

Oh, and that chair in the back? A Pottery Barn estate sale find. $20! 
One of my favorite things in this room, my Nana's earrings that I display in a shadowbox. I LOVE this so much, and it's easy to do with ribbon and a frame.
  
Here it is again with a thrift shop lamp, old records, and a Mary Poppins song book. 
  
Another view: the pictures sit on an Ikea shelf. 

 
Here is a look into the room:
Notice that I hung curtains, also Ikea, up to the ceiling in the playroom to close off any chaos that may ensue!
Opposing corner: 
Here is the hutch that matches the buffet. I adore it, but it may not be the perfect fit for this ever evolving space. Don't be surprised if you see it for sale in the future!

Atop of the hutch is our collection of Small World Dolls. These were a big hit around Christmas! 
Under the hutch is our collection of vintage Fisher-Price toys that my girls (8 and 5) still play with daily. 
Also pictured is our old school desk that my daughters complete their homework at. It's been calling at me for a coat of paint for years! 


This "Rock-a-bye Baby" pressed board wall art is going to be one of those things that will always have a spot in my home. I will have a hard time parting with it, I love it so! The nursery rhyme prints I bought with my late sister Mona when I was pregnant with my first (Charlotte), so I am keeping these forever as well! 
And the final touch is this lovely 1950's dress. I bought it at a vintage store closing because it was so beautiful. I figured maybe one day one of my daughters could wear it to a dance? But until then, it's wall art. 
 

I hope you enjoyed the first of many rooms to come in my home tour! Please leave a comment and let me know what you think. 

If you'd like to see more ways to give your home a vintage feel, please head over to One King's Lane and check them out!


Friday, April 18, 2014

Ugly outlet cover solution

I came up with this idea awhile ago, and I made mental note to put this in my "invention notebook", the one that does not exist. I keep on meaning to write down all of my genius ideas, but they are so fleeting, and I always forget:)! Anyway, this was one of those ideas.

That outlet is ugly, cream, and right in my face.
See, it may seem like nothing to most, but my counter height electrical outlets drive me nuts. I often find myself plugging in those small wall wax warmers just to stick something in them.

Then I thought, "why not a picture frame?".  I thought of using a frame with an outlet plug cover to jazz things up.

A quick trip to the Dollar Tree was in order to gather my supplies. I needed a lightweight 4x6 picture frame, lightweight and cheap!
This is what I decided on. Pretty basic.


Back view
 Next I removed the cheapo stand, a quick pull and it was gone, leaving a nice flat back.

Photo stand removed
 I then held my frame up to the wall outlet to see where I should position the outlet cover (that we all have leftover from when our babies were sticking their fingers where they shouldn't).
Position and THEN glue
 I then simply hot glued the outlet plug onto the back of the frame, and there you have it!


Add a photo!

Add a printable (I have a chalkboard "You Are My Sunshine" print in this picture)


Easily use it as a dry erase board. Just insert plain or patterned paper into the frame and use a dry erase marker in the glass!
Hope you enjoyed this easy project!

Sunday, March 2, 2014

Easter mason jars

Adorable, right? Adorable and easy as well! 

Here is what you need:

Mason jars
E-6000 glue
Spray paint
Easter figurines, found mine 3 for $.49 at Goodwill, dollar tree is also a great source. 


So basically you glue the figures to the jar lids with E-6000 and let cure at least overnight. The next day you can start painting. Allow at least 10 minutes between coats, using very light coats. 

After the lid is dry, fill however you like!

So adorable!!! Now if Spring could just get here:). 


Friday, February 28, 2014

Glass window update

This is the easiest update to glass windows!

We bought these cabinets on Craigslist years ago and upon installing them, we cracked a corner of one! It has always drove me a bit batty, plus our laundry room is in the main floor and easily visible. I like for our laundry room to appear tidy, and seeing into our cabinets wasn't working for me. 

I was going to go the route of the window film at Home Depot, but it seemed to be a bit more complicated than necessary. So I checked Amazon and bought this one:

http://www.amazon.com/DC-Fix-3460276-Self-Adhesive-Window/dp/B007B9PQ5W/ref=pd_sxp_grid_pt_0_2

Installation is super easy, just cut to size and adhere to the glass, just like contact paper. So easy and it looks great! My advice would be to buy an extra roll than what you think is needed. 

It looks much better, right?

Sunday, February 23, 2014

Back at it

Well, I am back after a wonderful break. My youngest is in kindergarten now and I have a bit more time for fun and creative outlets. Next year she will be in school FULL TIME and I decided now is my time.

Make it happen. 

Have fun while doing it.

Do what you love, what you enjoy. 

Yep, I can do that! 

I figured, why wait? I've had experience and feel confident enough now that I can make this into something. I mean, I have been thrifting long before Macklemore told me it was cool. I already wore my grandma's clothes, costume jewelry, loved her style. I adore an estate sale, and not to resell things, but for the stories they tell. I love seeing the potential in old furniture, or decorating with unusual found objects.

I also love creating. Pinterest has been the best and worst thing to happen to me since I joined 6 long years ago. I know many of you agree with me. I've had more "I can do that!" moments than I can count, and I can also blame that same site with the 5 pounds that won't leave, despite all of my fitness inspiration pins:).

So follow me on this journey! You can expect many crafty tutorials, pictures of my vintage and antique finds, along with pictures of pieces I am refinishing and selling.

Oh, and while you are here, check the links on the left to follow me on Instagram, Pinterest, and Facebook!

Wednesday, September 22, 2010

Embroidered handprint art

I wanted to embroider something small for the longest time. I am not an expert, but I do find it therapeutic. There is something about sitting there with a hoop, needle and thread that is so soothing for me. I wish I had more ideas in my head as far as embroidering because I can see myself doing this quite a bit on fall nights.

Here is the idea that I had and it turned out beautifully. Which I realize I say pretty often on here. Which I guess makes sense because why would I post about all of the half-butt projects I messed up through the years or only half finished?

Anyway, I digress. Here is the art...it speaks for itself.

Monday, September 13, 2010

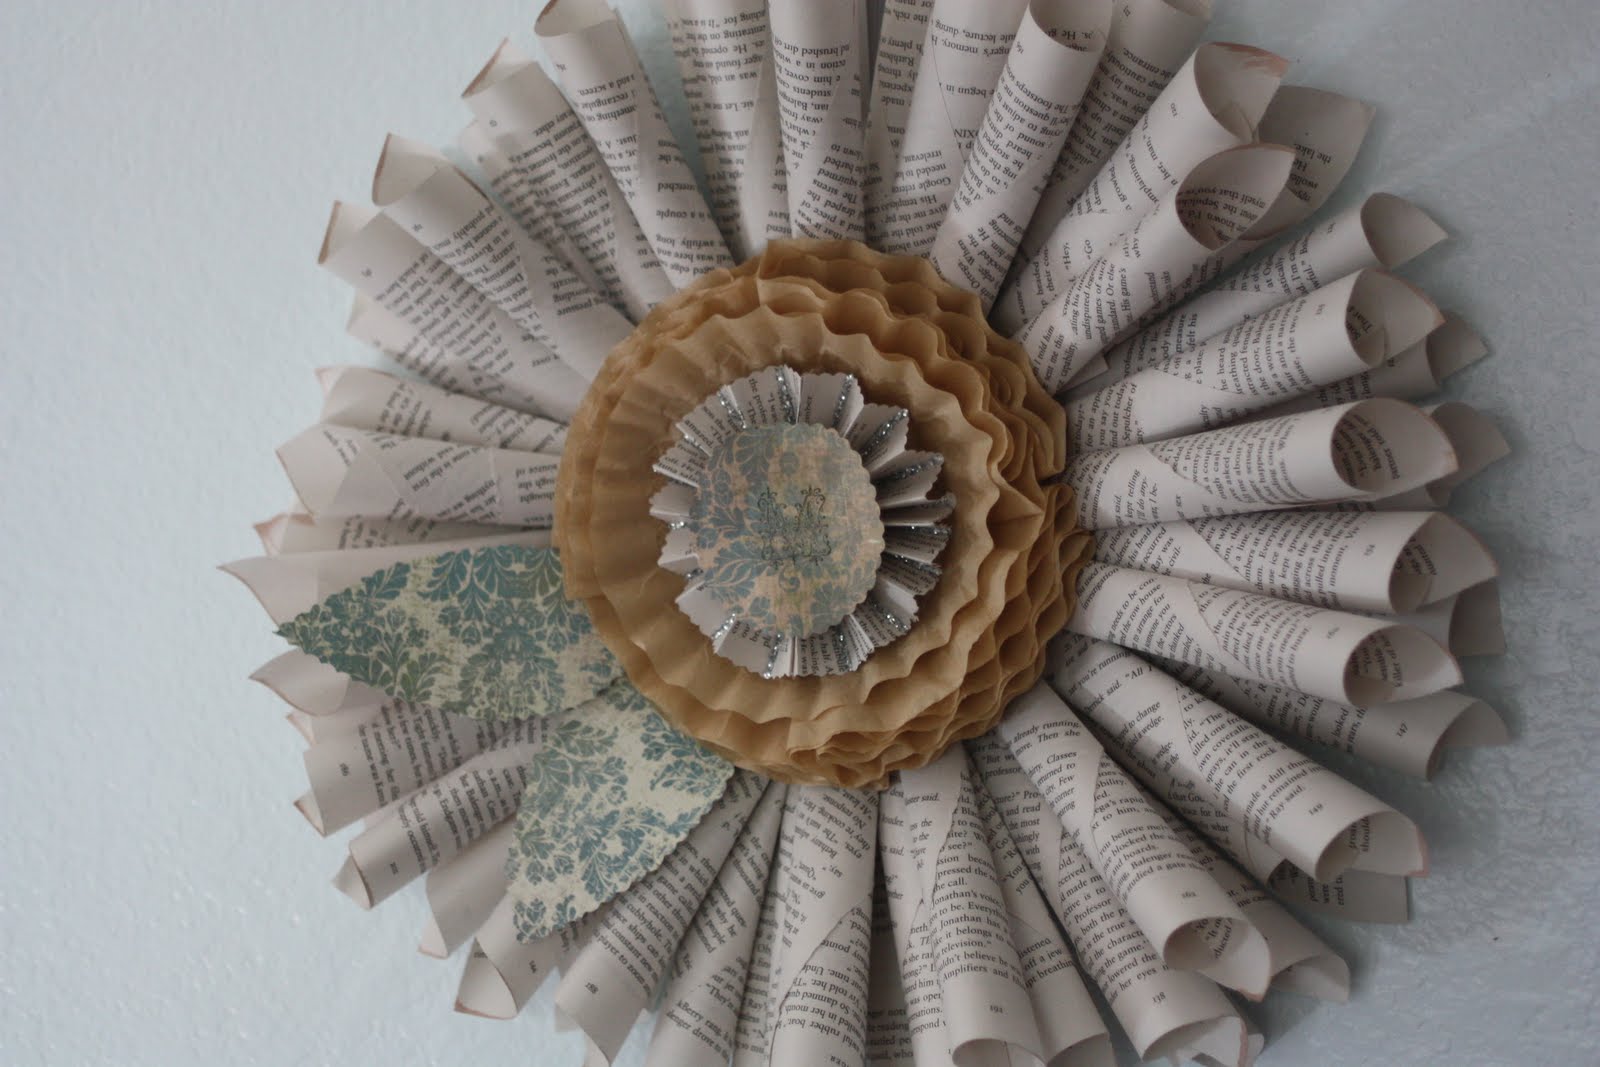
Stashbusting book and coffee filter wreath

I was inspired by According to Kelly and her $2 Book Wreath. I knew that it had to be my next craft. Plus I am trying very hard to use what I have on hand (and more than not, failing). So I took an old book I had on hand, just your standard paperback. I cut a circle out of a cereal box and got started!

Here is what the finished product looks like!

Here is what I used:

an old paperback book
coffee filters
scrap paper
glitter
stapler
glue
hot glue gun
scissors (regular and scalloped)
Cardboard or a paper plate
Ribbon

First step was to start making cones out of the paper, which I then stapled.
Put together 3 at a time, 2 in the back and one on top. At this point you can start gluing them to you plate or cardboard circle.
Once finished it will look something like this:
Here is the back view:
And showing you the base.

At this point you will want to fill in any bare spots that you have.
Then take your coffee filters, 2 at a time and fold in half and then half again (into a quarter). Repeat this three more times until you can make a circle. Glue together.
Now for the center. I accordioned 2 book pages and stapled them together then fanned them out to make a circle and glued together.
For a nice touch ala Lark and Lola, place a thin bead of glue in the creases and add glitter.
Then I trimmed two more filters to a smaller circle and glued then on top of my existing coffee filter circle.
Glue the coffee filter "flower" and its accordion center to the wreath, it is that simple!

I did use scrapbook paper for the center of my flower and stamped it with an "M", and then added 2 scrapbook paper leaves. Which turned out like this:
Oh, and I stapled some ribbon to the back for hanging. You can also use a real plate in place of the paper one and add a plate hanger for something more sturdy.

Have fun crafting!

Oh, and this is linked up to the following parties:
Cottage Instincts- Make it for Monday's
Between Naps On The Porch- Matamorphisis Monday