Tuesday, November 9, 2010

Tree branch earrings and a GIVEAWAY!

Lately I have been looking at our fireplace, dreaming of fires that will never get started. You see, we have a wood burning fireplace with a crazy draft so we have it covered and blocked. In the eight years we have been here in this house we've had about 2 or 3 fires. Dead serious. So what to do with all of this firewood?

I am thinking about painting the owl all white. What do you think?

Make earrings! In the past I showed you how to make buttons out of tree branches and this is basically the same idea. Of course you can always make the buttons and glue them to an earring post. That is what I am going to do in addition to this earring.

Here is what you will need:

  • Tree branch or twig/ log
  • Hand saw or miter saw
  • Mod Podge
  • Earring hooks
  • Jewelry pliers 
  • Drill
  • Jump rings
  • Scrap paper if desired
  1. First you cut your tree branch, mine is about 1.75- 2". Cut it about 1/8" thick.
  2. Drill a hole into the top of the earring, fairly close to the top to accommodate a jump ring.
  3.  Cut out your image onto scrap paper...endless possibilities!
  4. Mod Podge your paper onto the earring. I also made a plain pair that I just lacquered. Equally pretty!
  5. Mod Podge over the whole earring and let dry!
  6. Attach jump ring and hook
  7. Wear and enjoy!

 Now for the GIVEAWAY! You can win any of the following necklaces and 2 winners will be chosen. All you have to do is:

Follow me via Google Friend Connect and let me know which necklace you would choose. ***EDIT- since I am giving away 2 necklaces, please put your 1st and 2nd choices in your comment:). I didn't think that through, haha!***

That's it! Good luck! Oh, and let's close the giveaway on November 16th!

The choices:
1

2

3

4

5

6

7
8


Linked to:
http://thegirlcreativepartyblog.blogspot.com/
http://sewcando.blogspot.com/
The DIY Showoff
http://craftedition.blogspot.com/
http://www.thegypsyscorner.com/
http://beckieandbrad.blogspot.com/
http://thetrendytreehouse.blogspot.com/
http://www.mybackyardeden.com/
http://somedaycrafts.blogspot.com/
http://www.luckystarlane.com/
http://733blog.blogspot.com/
http://www.bluecricketdesign.net/
http://www.thethriftyhome.com/

Monday, November 8, 2010

Bathroom Redo

 So I repainted the bathroom on a whim this past week. I had some oops paint sitting around, which I had to then mix with my stash to get a nice blue...nightmare...but fun:)!

Here is the before, not bad, but a little too blah. I made those painting over the toilet buy stretching material over canvas, painting, and modpodging. The silhouettes are just pink construction paper of my husband, Charlotte, and I. No Matilda....time for a change!

Here I switched it up a bit, I found that Good Housekeeping picture at Goodwill but didn't like it in the bathroom. It will go into storage for now!
After...ahh much better! I put in the light fixture that I found at Goodwill as well- with all of the parts! None missing, and it had the original box and instructions. I love Goodwill! Now I just have to finish with a chair rail, possible beadboard wallpaper, and baseboard. Oh, and the fluorescent bulbs we have in the bathroom are not the best for picture taking. Sorry!

 The above prints are from Elsita on Etsy.
The burlap sign that I made. Make your own using my tutorial!

Linked to the following parties:
http://betweennapsontheporch.blogspot.com/
http://beckieandbrad.blogspot.com/

Poinsettia headband tutorial

It is beginning to look a teeny bit like Christmas around here. Thanks to the toy catalogs that come early in the mail, Charlotte is REALLY excited. I am not going to lie, I am too! I brought the Christmas cd's out of storage and bought a few new ones this weekend. Yes, I was suckered into ordering Mariah Carey's new Christmas and the new Now Christmas album as well...but I am not ashamed:)!

Anyway, this weekend Charlotte and I went through all of the Christmas storage boxes to see what we had before we start buying more. Very wise. We found some stationery that I bought for her letters to Santa, and we wrote and mailed her list!


***In case you are wondering what is on her list, or need gift ideas for little girls, here is what she wrote. Baby All Gone, a Cinderella doll, a Rapunzel hair braiding doll, and Zoobles. She has no clue what Zoobles are and neither do I:)! I Santa of course have my has his own list for her, haha. ***

Of course Charlotte found all of the singing Elmo's and Rudolph's and has been pressing my their buttons ever since!

So in the spirit of the holidays I whipped up a little tutorial for you! Charlotte loves this headband that I made for her and I do too. It really was so easy and looks lovely!You can use this pattern and make barrettes, holiday embellishments, headbands, bracelets...endless possibilities.

Poinsettia headband


 Supply list

  • green felt
  • red felt
  • hot glue gun or any glue really
  • a headband, I use the ones that come in a pack of 5 and are different colors
  • my poinsettia template
  • buttons for the center of the flowers, I used a snowflake button. You could also use white or yellow felt for the center.
  1. Cut out your felt using my template!
  2. Begin gluing starting with the green leaves, overlapping so that you have 8 leaves instead of 4 showing.
  3. Repeat with the red, layering biggest to smallest. 
  4. Finish with a button for the center. 
  5. Enjoy!
Have fun making these for all the little pretties on your life! Oh, and please only make these for personal use and for gifts. Pretty please?

Linking to the following parties:
The Girl Creative
Keeping It Simple
Making

http://sumossweetstuff.blogspot.com/
http://sewcando.blogspot.com/
http://craftedition.blogspot.com/
http://www.thegypsyscorner.com/
http://beckieandbrad.blogspot.com/
http://thetrendytreehouse.blogspot.com/
http://www.mybackyardeden.com/
http://somedaycrafts.blogspot.com/
http://www.luckystarlane.com/
http://733blog.blogspot.com/
http://www.bluecricketdesign.net/
http://www.thethriftyhome.com/


The DIY Show Off

Friday, November 5, 2010

Tree initial wall art- Tutorial!

I really don't know what to call it so I will let you decide:). It is a tree with mine and my husbands initials on it, so it is an initial tree, right? haha. Anyway, I had a wall in the new bathroom that needed filling and since I have a collection of embroidery hoops I decided on this.

Supply list:
embroidery hoop- I used a 12 inch one
muslin or another thick cotton fabric
acrylic paint for the tree
Fine tip paint brush
Embroidery floss
Embriodery needle
Hot glue gun

Optional

Grosgrain ribbon for flowers (or fabric for leaves if you prefer)
Needle and thread for grosgrain flowers
Ribbon for hanging
Paint for embroidery hoop


First you start with some muslin or other thick cotton fabric and an embroidery hoop. You can paint the embroidery hoop at this time or leave it until last (to decide how you like it once complete) like I did.

Then using a disappearing ink marker I sketched out my tree, heart, and initials. To make the bark in the tree I took my marker and rolled it in my fingertips while drawing a line down. It worked great, so try practicing that "technique" on some scrap paper!


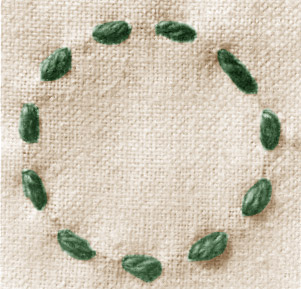
For the heart I used a basic running stitch using red embroidery floss.

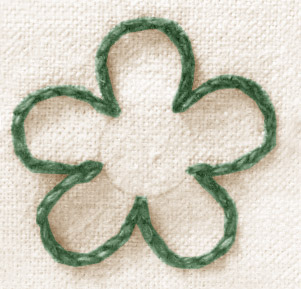
For the initials I used a split stitch so that it looked a bit more polished.

Both stitches are really easy.
Below are examples of each stitch for you!
   Running Stitch

Split stitch

Here is the end result of my hard labor:).


Now it is time to begin painting your tree. I have an assortment of acrylic paints, the $1 paints at craft stores. I would have preferred brown for the tree but the room it is going in is blue and black so I needed a darker shade. I settled for a brown/ blue/ gray/ green that I mixed. Using a fine tip paint brush I traced my outline, adding few additional touches here and there:).

Deciding that it needed a bit more I thought I would add some fabric leaves or some embroidered hearts throughout. I ended up making some ribbon flowers that I am still not committed to, but I do love them!
Take 4 inches of grosgrain ribbon and burn the ends to prevent from fraying.


Tie a knot at the end of your threaded needle and sew a running stitch at the bottom of the ribbon.

Pull that stitch tight to create a flower or yo-yo.
Notice the Emergen-C in the back. Yeah, I am sick. Awesomeness.
Here I go through the loop at the beginning knot and double knot my thread to secure.


The result...if I were brave enough to commit to these flowers! haha!

***Now is the time to paint your frame if you decide to or haven't painted it already!***

Notice the pins in the back? Yep, that is me trying decide on the flowers!


Pull your fabric tight and tighten your hoop screw.


Cut the excess fabric as you would trim a pie.

Then hot glue the fabric over onto the hoop as shown.

At this point, if wanting a more polished look or if giving this as a gift, add ribbon to the inside for a nice touch.
Finally, loop a ribbon through to hang and admire your work!
PS, you will see that I was noncommittal with the flowers. What do you think? With or without?


 Oh, and a great part to the day? Seeing this in the mail!
How cute is she???
Do you follow Enjoying The Small Things and Kelle Hampton? You have to! She is an amazing mother and photographer with an even more amazing story. I love her and don't even know her, although I picture myself as her bestie at times.

Anyway, I donated what I could to the walk that she participated in for Nella (her daughter born with Down's Syndrome) and I got this super sweet thank you letter from the Hampton's. Oh, and Nella thinks I am a rockstar which earns her a place on my fridge:)!

Linked to the following parties:
 UndertheTableandDreamingPhotobucket


Punkin Seed Productions

 calm+breeze+banner+friday.jpg