 A Few Of My Favorite Things on winning the bear hat giveaway!

Sunday, November 21, 2010
Congrats to the hat winner!
Congrats #12, Jessica from A Few Of My Favorite Things on winning the bear hat giveaway!
A Few Of My Favorite Things on winning the bear hat giveaway!
Wednesday, November 17, 2010
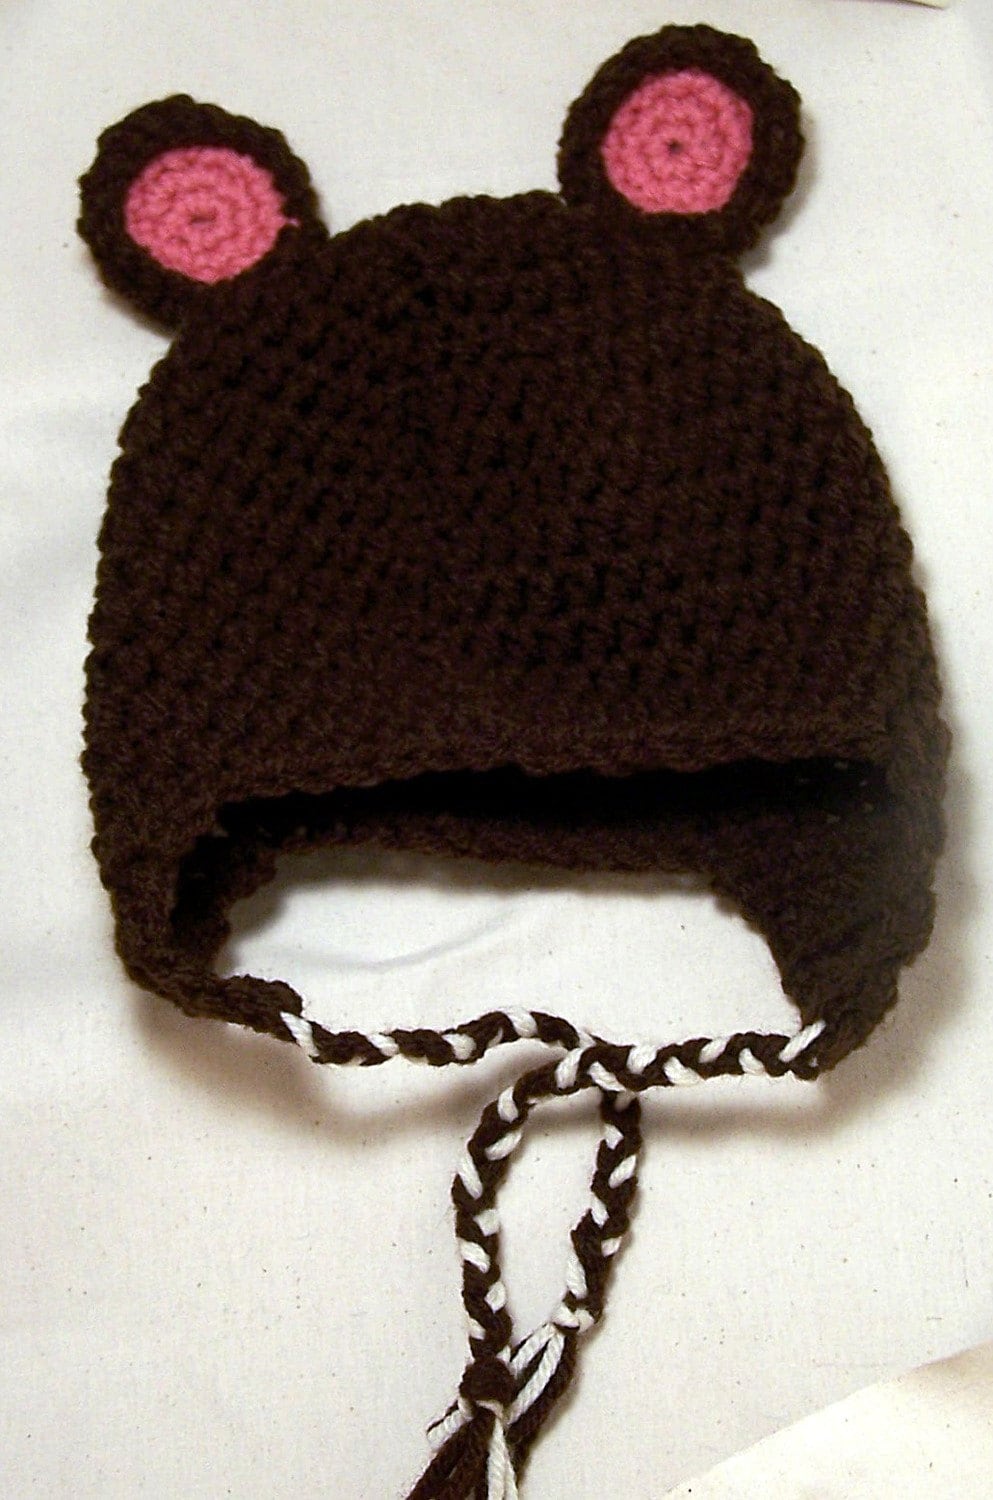
Bear hat giveaway!
I am glad to have the opportunity to give away this sweet hat from etsy shop Bowrene! She is kind enough to make this in baby, toddler OR adult size. Check out her shop for more fun items, and she is always up for custom orders!
***EDIT- Don't have a child? Breanna will work with you on an adult hat:)! Thanks Bre!!!!***
 To win all you have to do is become a follower (if you already are, then thank you) then leave a comment!
For additional entries (leave one comment for each of the following):
Like Livvy Loo on Facebook
Like Bowrene on Facebook
Heart my shop on Etsy (more to be listed soon...possibly some more capes, I swear)
Heart Bowrene on Etsy
Oh, and this is a quick one. The giveaway will end November 20th at midnight MST!
***EDIT- Don't have a child? Breanna will work with you on an adult hat:)! Thanks Bre!!!!***
For additional entries (leave one comment for each of the following):
Like Livvy Loo on Facebook
Like Bowrene on Facebook
Heart my shop on Etsy (more to be listed soon...possibly some more capes, I swear)
Heart Bowrene on Etsy
Oh, and this is a quick one. The giveaway will end November 20th at midnight MST!
Necklace winners!
Via Random.org here are the following winners:
#4
#15
Didn't win? Well, you can look forward to another giveaway later today:)!
#4
- I'm a follower/ worshiper :-) I am coveting necklace #2!!!
#15
- I am proud to be your 100th follower (Yay!) ...1st choice would be the mutlicolored four flowers, 2nd choice the one with the heart brooch on it. They are all lovely. jhbalvin at gmail dot com
Didn't win? Well, you can look forward to another giveaway later today:)!
Thursday, November 11, 2010
Romantic belt tutorial
Lately while at my thrift store (I can call it that since the ladies that work there like to have my kids call them Aunt "whatevertheirnameis", I love that place!) I have been buying any wide belt that I can get my hands on.
I mean, the belts are only 99 cents, quite a bargain. Even cheaper is when you discover in your own closet a slew of your own quite outdated belts. I may have even squeaked in delight when I saw some thin, probably fake leather, belts of my own. So I grabbed some embroidered trim I've had for years, my glue gun, and made something fabulous.
Oh, and don't forget to enter my giveaway!!! :)
Here is what you will need:
Measure from the belt hole (?) you are most likely to use to right before the loop on the oppisite side.
Multiply that number by 1.6.
Cut 2 pieces of eyelet trim using your above number.
Sew or serge these 2 pieces right sides together.

Ruffle this piece, setting your machine to the longest stitch and highest tension. On my machine this is 9 tension and 5 stitch length.


Fold over the ends of the trim and sew for a nice finished hem.

Lay the ruffle flat now, smooth, and make sure that it fits the belt, between the holes and the buckle.


Start glueing! To make this easy I first glued the ends and worked my way in. Then I glued one side at a time. Take care to keep the ruffle centered!

Voila, you're done!


 While I was trying to get some pics of the belt, the little one wanted some love!
 Linked to the following parties!
http://thetrendytreehouse.blogspot.com/
http://www.theshabbychiccottage.net/
http://733blog.blogspot.com/
http://lifeaslori.blogspot.com/
http://www.theshabbychiccottage.net/
http://www.somewhatsimple.com/
http://shabbynest.blogspot.com/
http://thehillsarelivin.blogspot.com/
http://itsahodgepodgelife.blogspot.com/
http://tatertotsandjello.blogspot.com/2010/11/weekend-wrap-up-party-and-sugar-and.html
I mean, the belts are only 99 cents, quite a bargain. Even cheaper is when you discover in your own closet a slew of your own quite outdated belts. I may have even squeaked in delight when I saw some thin, probably fake leather, belts of my own. So I grabbed some embroidered trim I've had for years, my glue gun, and made something fabulous.
Oh, and don't forget to enter my giveaway!!! :)
Here is what you will need:
- Eyelet trim, mine is about 2.5 inches wide
- A thin belt
- glue gun
- sewing machine (you can probably just glue the whole thing to be honest)
Measure from the belt hole (?) you are most likely to use to right before the loop on the oppisite side.
Multiply that number by 1.6.
Cut 2 pieces of eyelet trim using your above number.
Sew or serge these 2 pieces right sides together.

Ruffle this piece, setting your machine to the longest stitch and highest tension. On my machine this is 9 tension and 5 stitch length.


Fold over the ends of the trim and sew for a nice finished hem.

Lay the ruffle flat now, smooth, and make sure that it fits the belt, between the holes and the buckle.


Start glueing! To make this easy I first glued the ends and worked my way in. Then I glued one side at a time. Take care to keep the ruffle centered!

Voila, you're done!


http://thetrendytreehouse.blogspot.com/
http://www.theshabbychiccottage.net/
http://733blog.blogspot.com/
http://lifeaslori.blogspot.com/
http://www.theshabbychiccottage.net/
http://www.somewhatsimple.com/
http://shabbynest.blogspot.com/
http://thehillsarelivin.blogspot.com/
http://itsahodgepodgelife.blogspot.com/
http://tatertotsandjello.blogspot.com/2010/11/weekend-wrap-up-party-and-sugar-and.html
Wednesday, November 10, 2010
Solar system banner

Well, I spent hours online looking for a great Solar System mobile and found nothing that I loved. I found one that someone had hand knitted but I can't
We used various cups and bowls around the house and cut out our planets (don't forget to poke a hole out of the top with a straw if you plan on hanging it!). After they were done baking I let Charlotte paint them all by herself. When I say all by herself I mean it. She mixed her own paint, added Jupiter's dot, put clouds on the Earth...all of it! I love the way it turned out! What do you think?
PS, we just hung it by the mantle for "all to see" as Charlotte puts it. More pics to come once we hang it in her room!


http://thetrendytreehouse.blogspot.com/
http://www.mybackyardeden.com/
http://somedaycrafts.blogspot.com/
http://www.luckystarlane.com/
http://733blog.blogspot.com/
http://www.bluecricketdesign.net/
http://www.thethriftyhome.com/
http://tatertotsandjello.blogspot.com/2010/11/weekend-wrap-up-party-and-sugar-and.html
Tuesday, November 9, 2010
Tree branch earrings and a GIVEAWAY!
Lately I have been looking at our fireplace, dreaming of fires that will never get started. You see, we have a wood burning fireplace with a crazy draft so we have it covered and blocked. In the eight years we have been here in this house we've had about 2 or 3 fires. Dead serious. So what to do with all of this firewood?
Make earrings! In the past I showed you how to make buttons out of tree branches and this is basically the same idea. Of course you can always make the buttons and glue them to an earring post. That is what I am going to do in addition to this earring.

Here is what you will need:
Now for the GIVEAWAY! You can win any of the following necklaces and 2 winners will be chosen. All you have to do is:
Follow me via Google Friend Connect and let me know which necklace you would choose. ***EDIT- since I am giving away 2 necklaces, please put your 1st and 2nd choices in your comment:). I didn't think that through, haha!***
That's it! Good luck! Oh, and let's close the giveaway on November 16th!
The choices:
Linked to:
http://thegirlcreativepartyblog.blogspot.com/
http://sewcando.blogspot.com/
The DIY Showoff
http://craftedition.blogspot.com/
http://www.thegypsyscorner.com/
http://beckieandbrad.blogspot.com/
http://thetrendytreehouse.blogspot.com/
http://www.mybackyardeden.com/
http://somedaycrafts.blogspot.com/
http://www.luckystarlane.com/
http://733blog.blogspot.com/
http://www.bluecricketdesign.net/
http://www.thethriftyhome.com/
 |
| I am thinking about painting the owl all white. What do you think? |
Make earrings! In the past I showed you how to make buttons out of tree branches and this is basically the same idea. Of course you can always make the buttons and glue them to an earring post. That is what I am going to do in addition to this earring.

Here is what you will need:
- Tree branch or twig/ log
- Hand saw or miter saw
- Mod Podge
- Earring hooks
- Jewelry pliers
- Drill
- Jump rings
- Scrap paper if desired
- First you cut your tree branch, mine is about 1.75- 2". Cut it about 1/8" thick.
- Drill a hole into the top of the earring, fairly close to the top to accommodate a jump ring.
- Cut out your image onto scrap paper...endless possibilities!
- Mod Podge your paper onto the earring. I also made a plain pair that I just lacquered. Equally pretty!
- Mod Podge over the whole earring and let dry!
- Attach jump ring and hook
- Wear and enjoy!
Now for the GIVEAWAY! You can win any of the following necklaces and 2 winners will be chosen. All you have to do is:
Follow me via Google Friend Connect and let me know which necklace you would choose. ***EDIT- since I am giving away 2 necklaces, please put your 1st and 2nd choices in your comment:). I didn't think that through, haha!***
That's it! Good luck! Oh, and let's close the giveaway on November 16th!
The choices:
 |
| 1 |
 |
| 2 |
 |
| 3 |
 |
| 4 |
 |
| 5 |
 |
| 6 |
 |
| 7 |
 |
| 8 |
http://thegirlcreativepartyblog.blogspot.com/
http://sewcando.blogspot.com/
The DIY Showoff
http://craftedition.blogspot.com/
http://www.thegypsyscorner.com/
http://beckieandbrad.blogspot.com/
http://thetrendytreehouse.blogspot.com/
http://www.mybackyardeden.com/
http://somedaycrafts.blogspot.com/
http://www.luckystarlane.com/
http://733blog.blogspot.com/
http://www.bluecricketdesign.net/
http://www.thethriftyhome.com/
Monday, November 8, 2010
Bathroom Redo
So I repainted the bathroom on a whim this past week. I had some oops paint sitting around, which I had to then mix with my stash to get a nice blue...nightmare...but fun:)!
Here is the before, not bad, but a little too blah. I made those painting over the toilet buy stretching material over canvas, painting, and modpodging. The silhouettes are just pink construction paper of my husband, Charlotte, and I. No Matilda....time for a change!
 Here I switched it up a bit, I found that Good Housekeeping picture at Goodwill but didn't like it in the bathroom. It will go into storage for now!
 After...ahh much better! I put in the light fixture that I found at Goodwill as well- with all of the parts! None missing, and it had the original box and instructions. I love Goodwill! Now I just have to finish with a chair rail, possible beadboard wallpaper, and baseboard. Oh, and the fluorescent bulbs we have in the bathroom are not the best for picture taking. Sorry!

 The above prints are from Elsita on Etsy.
 The burlap sign that I made. Make your own using my tutorial!
Linked to the following parties:
http://betweennapsontheporch.blogspot.com/
http://beckieandbrad.blogspot.com/
Here is the before, not bad, but a little too blah. I made those painting over the toilet buy stretching material over canvas, painting, and modpodging. The silhouettes are just pink construction paper of my husband, Charlotte, and I. No Matilda....time for a change!


Linked to the following parties:
http://betweennapsontheporch.blogspot.com/
http://beckieandbrad.blogspot.com/
Poinsettia headband tutorial

Anyway, this weekend Charlotte and I went through all of the Christmas storage boxes to see what we had before we start buying more. Very wise. We found some stationery that I bought for her letters to Santa, and we wrote and mailed her list!


Of course Charlotte found all of the singing Elmo's and Rudolph's and has been pressing

So in the spirit of the holidays I whipped up a little tutorial for you! Charlotte loves this headband that I made for her and I do too. It really was so easy and looks lovely!You can use this pattern and make barrettes, holiday embellishments, headbands, bracelets...endless possibilities.
Poinsettia headband


Supply list
- green felt
- red felt
- hot glue gun or any glue really
- a headband, I use the ones that come in a pack of 5 and are different colors
- my poinsettia template
- buttons for the center of the flowers, I used a snowflake button. You could also use white or yellow felt for the center.
- Cut out your felt using my template!
- Begin gluing starting with the green leaves, overlapping so that you have 8 leaves instead of 4 showing.
- Repeat with the red, layering biggest to smallest.
- Finish with a button for the center.
- Enjoy!
Linking to the following parties:


http://sumossweetstuff.blogspot.com/
http://sewcando.blogspot.com/
http://craftedition.blogspot.com/
http://www.thegypsyscorner.com/
http://beckieandbrad.blogspot.com/
http://thetrendytreehouse.blogspot.com/
http://www.mybackyardeden.com/
http://somedaycrafts.blogspot.com/
http://www.luckystarlane.com/
http://733blog.blogspot.com/
http://www.bluecricketdesign.net/
http://www.thethriftyhome.com/

Subscribe to:
Posts (Atom)