
Friday, January 29, 2010
And the winner is...
Michele, the Clipa winner! Congrats Michele, I hope you love your Clipa as much as I do!
Thursday, January 28, 2010
I can paint?
Yep, yet another hobby to check off the list. Painting. And I can't stop! Seriously. I am drawing and painting anytime my kids are playing and napping. I have so many ideas in my head I just need to put them on paper. And I am kind of digging what I've done so far. So sorry sewing machine, I think I am over you, at least for the next few days:)
Oh, yeah, I am going to start taking custom orders, so email me if you are interested!


Oh, yeah, I am going to start taking custom orders, so email me if you are interested!


Tuesday, January 26, 2010
Monday, January 25, 2010
Tutorial- braided fabric elastic headband
Browsing the $1 section of Target looking at all of the things I don't need (but want), I saw something I swore was mispriced. Nope, 6 elastic headbands for $1. I knew a tutorial was in the works. So here we go!
So gather your supplies!
Fabric scraps- coordinating or happily mismatched (I only needed 21 inches for my headband)
elastic headband
sewing machine or needle and thread


Getting started:
Step 1- Tear or cut (3) half inch strips of fabric


Step 2- Stack strips on elastic band 2 on top, one on the bottom. Sew to elastic band, front and backstitch to secure.

Step 3- Attach the band to something stable, I used my lampshade.

Step 4- Braid all the way around band, braiding the band WITH the 3rd piece. Move your clip up as needed.


Step 5- Finish the braid leaving 2.5-3 inches unfinished. I went with 3 inches for comfort.
Step 6- Repeat step 2 and securely sew the strips to the band.

Step 7- Snip off excess, at this point try it on to see how it fits. You may need to take out the stitches and bring it up a bit (and sew again) if it's too tight.
Step 8- Show off your smoking hot new headband...after taking 75 pictures of the top of your head, all of which focused on the kids behind you, the floor, or your armpit. And be proud of yourself! You did it all by yourself! Enjoy!


So gather your supplies!
Fabric scraps- coordinating or happily mismatched (I only needed 21 inches for my headband)
elastic headband
sewing machine or needle and thread


Getting started:
Step 1- Tear or cut (3) half inch strips of fabric


Step 2- Stack strips on elastic band 2 on top, one on the bottom. Sew to elastic band, front and backstitch to secure.

Step 3- Attach the band to something stable, I used my lampshade.

Step 4- Braid all the way around band, braiding the band WITH the 3rd piece. Move your clip up as needed.


Step 6- Repeat step 2 and securely sew the strips to the band.

Step 7- Snip off excess, at this point try it on to see how it fits. You may need to take out the stitches and bring it up a bit (and sew again) if it's too tight.
Step 8- Show off your smoking hot new headband...after taking 75 pictures of the top of your head, all of which focused on the kids behind you, the floor, or your armpit. And be proud of yourself! You did it all by yourself! Enjoy!


Sunday, January 24, 2010
Play with your food
In an effort to make dinner fun I whipped up some meatloaf cupcakes today. Now I know that somewhere out in blogland these have probably been done. That said I am NOT going to google it, because I like to think that these are my very own creation. Oh, and I didn't use the Lipton soup mix recipe, I used my own (which oddly enough had onion soup in it, haha).
Both kids loved this, but honestly I think if I stuck a candle in anything and sung the "unbirthday" song they may eat it. May. So here it is...
Melissa's meatloaf cupcake (I can't stop laughing at the name)
Preheat oven to 350
Ingredients
2 lbs lean ground beef
1 packet of dried onion soup mix
1 egg
1/4 c ketchup
1/2 c breadcrumbs
2 T worcestershire
2 t season all
Combine meat mixture with hands, do not overmix (makes your end result a bit chewy).
Place meat mixture into greased muffin pan.
Bake for 30-35 minutes.
Frosting and sprinkles: mashed potatoes and peas!
 Add candle and sing songs for garnish. Enjoy!

Both kids loved this, but honestly I think if I stuck a candle in anything and sung the "unbirthday" song they may eat it. May. So here it is...
Melissa's meatloaf cupcake (I can't stop laughing at the name)
Preheat oven to 350
Ingredients
2 lbs lean ground beef
1 packet of dried onion soup mix
1 egg
1/4 c ketchup
1/2 c breadcrumbs
2 T worcestershire
2 t season all
Combine meat mixture with hands, do not overmix (makes your end result a bit chewy).
Place meat mixture into greased muffin pan.
Bake for 30-35 minutes.
Frosting and sprinkles: mashed potatoes and peas!

Saturday, January 23, 2010
Fun day of estate sales and crafting...and a great mail day!
First for the things I made! All are available in my Etsy shop:)
Expect a tutorial (or two) this weekend!

Mushroom trinket box with surprise gnome!

Woodland yo-yo headband (hand-dyed)

braided fabric necklace with vintage accent
Now onto a few of my finds at the estate sale. This woman was a fellow crafter and had some useful tools for me. I also picked up plenty of costume jewelry for future pieces. Overall a great time!

Costume jewelry that I love!

A porcelain owl with a pin cushion back.

Then I found a great handmade sewing basket, it's pretty wonderful, right?
AND when I came home I had two whole packages for me. A great ending to a great day!
The first thing I opened were Charlotte's new shoes from Livie and Luca, in their yellow Holland style. I really want a pair for myself they are so precious!

Then I opened my fabric from Hawthorne Threads. So many possibilities!

Wednesday, January 20, 2010
Clipa giveaway!


How many times have you stopped in your car to only have everything spill out onto the floor? Well, Clipa solves that problem!
Clipa keeps your handbag off the ground and away from germs, water, and dirt (really who knows what else?)! Specially angled, clear non-slip pads provide full surface contact on tables (no wobbling). It is also designed for today's bigger heavier bags.


Now for the contest details. I have one Clipa in their Maya style, polished hematite to give away. How do you enter?
Mandatory: Just leave a comment with your email in the comments section. Yep that's it!
For additional entries (leave an additional comment for each):
-Become a follwer of Livvy Loo Who, or leave me a comment telling me you already are
-Become a fan of Livvy Loo on Facebook, or leave me a comment telling me you already are
-Become a fan of Clipa on Facebook
Giveaway ends Jan 27th @11:59PM MST. US only. Winner will be picked via Random.org and announced the following day. Please respond within 48 hours, or a new winner will be chosen.
Good luck!
Thank you for checking out Clipa, from Livvy Loo Who!!!
Tuesday, January 19, 2010
Craft / sewing room... nearly finished!
Well, it's getting there! I at least have my corner to sew in. What do you think? I tried to make it practical and pretty.

Here is the before, ack!
And after! Much better...


And after! Much better...


Monday, January 18, 2010
Tutorial- Wooden twig / wood branch / tree branch buttons
While in the backyard, picking up you know what, I noticed that there were plenty of tree branches laying around after our last snowfall. So what is a girl to do? Leave the cleaning up to her darling husband and go inside and make buttons! This may be one of the easiest projects you may ever complete, and it's very rewarding to see your finished project.
So let's get started, here is what you will need to make your own DIY wood tree branch buttons.
Branch or twig
Hand saw or table saw
Sandpaper
Drill- I used a 5/64 bit and it was perfect
Wood polish (optional)
Step 1
Find a nice looking branch or twig. The sturdier the better, and you want to make sure that your bark is intact and doesn't peel off too easy. OR you want the bark to peel off really easy if you like the look of barkless buttons. Mine turned out half and half, not ideal for me, but not as bad looking as I thought.

Step 2
Saw your branch into 1/8 inch pieces. If your branch is very sturdy you could go even smaller. You will figure this out after your first cut. Now, I started off using my husbands table saw but that turned out not so well. Let's just say that I still have both eyeballs, but it was a close one. So I quickly switched to a hand saw, fine toothed. Unless eye patches are cool where you live, I recommend a hand saw too.


Step 3
Lightly sand the surface and sides of your button. This is to prevent snags but truly this isn't meant to be a functional button for me, just decorative, so I didn't go crazy with this step.


Step 4
Drill 2 or 4 holes into your button, depending on the look you want. I go for 2 since I am a lazy button sewer kind of lady. Also, the middle of my branch was so weak that I just set the drill on top and a hole was punched in the center. Next time I will look for a better branch. Weak bottom branch.
***No pictures here. It is really hard to hold a camera and drill tiny holes at the same time~
Step 5
Completely optional, and after completing this step I won't do it again. If you want a darker button face then this is a good way to get the look. I tried 3 different types of wood cleaner and polish that I had on hand. My favorite was the wood conditioner that I had on hand for our wood handled steak knives.


Step 6
Arrange your buttons on a crazy pretty bird plate and admire how very crafty you are. I suggest a cup of coffee too. Oh, I mean, put your button on something cool and show it off! I am currently looking for the perfect piece to attach it to. Those pics are to come!


So let's get started, here is what you will need to make your own DIY wood tree branch buttons.
Branch or twig
Hand saw or table saw
Sandpaper
Drill- I used a 5/64 bit and it was perfect
Wood polish (optional)
Step 1
Find a nice looking branch or twig. The sturdier the better, and you want to make sure that your bark is intact and doesn't peel off too easy. OR you want the bark to peel off really easy if you like the look of barkless buttons. Mine turned out half and half, not ideal for me, but not as bad looking as I thought.

Step 2
Saw your branch into 1/8 inch pieces. If your branch is very sturdy you could go even smaller. You will figure this out after your first cut. Now, I started off using my husbands table saw but that turned out not so well. Let's just say that I still have both eyeballs, but it was a close one. So I quickly switched to a hand saw, fine toothed. Unless eye patches are cool where you live, I recommend a hand saw too.


Step 3
Lightly sand the surface and sides of your button. This is to prevent snags but truly this isn't meant to be a functional button for me, just decorative, so I didn't go crazy with this step.


Drill 2 or 4 holes into your button, depending on the look you want. I go for 2 since I am a lazy button sewer kind of lady. Also, the middle of my branch was so weak that I just set the drill on top and a hole was punched in the center. Next time I will look for a better branch. Weak bottom branch.
***No pictures here. It is really hard to hold a camera and drill tiny holes at the same time~
Step 5
Completely optional, and after completing this step I won't do it again. If you want a darker button face then this is a good way to get the look. I tried 3 different types of wood cleaner and polish that I had on hand. My favorite was the wood conditioner that I had on hand for our wood handled steak knives.


Step 6
Arrange your buttons on a crazy pretty bird plate and admire how very crafty you are. I suggest a cup of coffee too. Oh, I mean, put your button on something cool and show it off! I am currently looking for the perfect piece to attach it to. Those pics are to come!


Friday, January 15, 2010
Winner of our first giveaway!
Thanks Kisha at In Through The Out Door for hosting my very first giveaway. Also congrats to the winner Melissa at http://styleezta.blogspot.com/. Melissa won the faux bois bib necklace, but don't worry, you too can get yours (just follow the links on the right to my Etsy shop!).

Look for more giveaways and tutorials in the near future!

Look for more giveaways and tutorials in the near future!
Thursday, January 14, 2010
More free Etsy banners!
hedgehog and gnome banner

matryoshka Russian nesting doll banner

gnome faux bois banner

Click on the banner to save the full-sized version and add your shop name. Enjoy!

matryoshka Russian nesting doll banner

gnome faux bois banner

Click on the banner to save the full-sized version and add your shop name. Enjoy!
Wednesday, January 13, 2010
Free Etsy banner
Here is my very first free etsy banner. I made this for my own shop and wanted to share. I LOVE it, but if this isn't your thing, there are more free banners to come if there is enough interest! Thoughts?

Monday, January 11, 2010
Weekend of treasures
So I am in the process of making myself a craft room and I took it upon myself (who else? haha) to go shopping for decor. And when I say shopping I mean thrifting, during the kids naps! What treasures I found too! Take a look for yourself. Oh and sorry for the lighting, I took these pics at night and really dislike flash:)
First I took a trip to The Fancy Tiger, where I rarely get to go with kids. Love that store, such unique fabrics, many Japanese imports. Here are two that I walked away with, only half a yard each should be plenty for what I need.


First I took a trip to The Fancy Tiger, where I rarely get to go with kids. Love that store, such unique fabrics, many Japanese imports. Here are two that I walked away with, only half a yard each should be plenty for what I need.


Then off to Goodwill(s). It was a good trip.
Lefton Valentine wind up music angel.

Mushroom teapot, perfect for Charlotte's upcoming Alice in Wonderland birthday party.

Now try not to laugh at this next one. When I first saw it, I thought how ugly, but it didn't really matter to me because it was two things...old and an owl. Then I checked the tag and it was a Winnie the Pooh Owl by Gund. And mine.


Cute little bunny couple.

Gorgeous woven porcelain vase

Sewing cabinet with an old Waverly type print. Stand upright and was in perfect condition. I love it!


Two cute vintage fabric remnants, over a yard each.


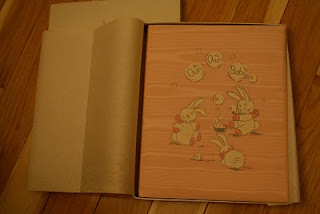
1960's/ 70's girl baby book, unwritten in perfect condition with the original packaging.


Maybe my favorite purchase of the day, because of its potential. So many things I can do with this book, but where to start. Any suggestions?


Subscribe to:
Posts (Atom)